|
So,
on we go…
I
picked up this Hasagawa P-47D 1/32 scale kit a few months ago (almost two years
ago now), and I decided to start building it because I had nothing to do at the
time. I intended to build this P47 out of the box (OOB) no changes and no
additions, just follow the instructions and get the job done. I thought,
"Hey, let’s document as much as I can". Nevertheless, I threw in a
few things just for heck of it. One of which was to do it in kitchen foil but
don’t let this discourage you. I truly believe that in many ways it is easier
to foil a kit than to paint it. I’m not going to cover “how to” foil but
there is still a lot of painting required, so never fear.
The
really talented builders are going to cringe when they see what I do to this P47
kit. However, please, keep in mind this built is pure fun for me, nothing else.
Click on
images below to see larger images
|

|
|

|
|
|
|

|
|
Photo 3 |
|
Photo 4 |
|
Photo 5 |
|
Photo 6 |
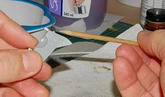
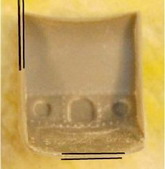
The
first thing you have to do is cut parts off the sprues. There are several good
ways to do this and several bad ways. Don’t twist, pull, snap or punch out the
part. I generally use wire cutters (available at Home Depot for 1/3 the cost of
the hobby store’s pair) and always leave a significant nub attached to the
part after cutting. Then with an art knife I cut the rest of the nub. If
you’re not sure you can “art knife” it off without damaging the part or
yourself then sand it off. You should give this process a little thought, if you
just hack the part off then you’re probably going to create a compression
wound on it. This is going to require you to use some filler to hide. Unless of
course you just don’t care about the mark and if that’s the case, I envy
you.
See
photos 03, 04, 05, 06 and 07
Now
that you can get the part off with minimum fuss, let’s start on the kit.
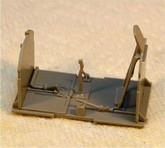
The
instructions say start with the cockpit. I started with the engine. Why? It took
me a long time to figure out how to start building a kit and this is where
experience comes into play. I often change the order of building simply because
I see an advantage when it comes to fitting and/or painting. You on the other
hand, should follow the order given in the instructions until you’ve acquired
enough experience to not do that. I read the instructions front to back before I
start building a kit and I highly recommend you do the same.
Out
of the box means generally, a build which has no aftermarket product or scratch
built items added to the kit. I am going to do some minor, minor customizing by
detailing the engine just a little bit. All I’m going to do is add some
ignition wires. If you want you can do the same or skip this part of the engine
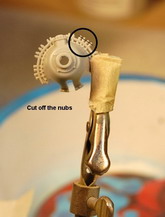
build.
The
picture shows me cutting off the nubs so I can drill some holes and stick in
some wires. After using my art knife to remove them, I poke a little hole in the
center where the nubs once were. I do this by eye and just get as close to
center as I can and make a light mark. If you’re off centre, buff out the
light mark and try again. If it’s good then push it in deeper. The purpose of
the small hole is to give me a starting place to drill, nothing else. Now I take
my Pin Vice (just a nice way of saying “hand drill”), push against the
center punched hole and twist! This isn’t really a difficult thing to do so
don’t be hesitant to try it.
See
photos 08, 09, 10 and 11
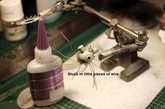
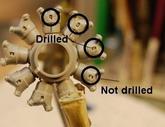
I
cut wire into little pieces
and CA glued them in place (Crazy Glue or Super Glue). Next, I drilled out the
place where I’m going to stick the wires into on the cylinder heads.
Now
a little painting; I know people (and I used to be one of them), who get to a
point where you have to paint something, let’s say silver. Then would cut off
and collect every part in the kit that had to be painted silver so they could
paint them all at once, thus only having to clean the airbrush once. I have
since come to the realization this is a bad idea. The parts sit around and you
spill stuff on them, lose them, sneeze and many of them hit the floor. If that
happens you can count on a few things; as soon as you move your foot you will
step on one of the pieces or, you will spend the next 4 hours on your hands and
knees trying to find it. When you can’t, you’ll give up looking. Then
you’ll call in the kids in the room and offer them $5 bucks each if they can
find it, when they give up you’ll up it to $20 for the one that finds it. Then
you’ll either spend 4 hours fabricating a new one, begging someone on the ARC
forum to send you their “extra one”, sending away to the manufacturer for a
replacement or even buying the whole kit again. Once you solve the problem by
making or getting a new piece, you’ll stand back and look at it with the
satisfaction of a conquering general. While you’re admiring your work, out of
the corner of your eye you’ll see something sitting in the middle of the
floor. It’ll be the piece you lost a month ago. Don’t fight it, just accept
it.
Now
I limited how many pieces I cut off the sprues in order to avoid losing or
damaging pieces unnecessarily. Some people like to paint the parts right on the
sprue then cut them off and touch them up. I don’t use this method. If there
is a small part I have to paint before assembling, I remove it from the sprue
and if I can’t hold it in my fingers or with tweezers then I’ll stick it on
the end of a pin and paint it.
Unless
you’re going to use parts in the next few hours, then I leave them on the
sprue. Cleaning the airbrush is not difficult so don’t be lazy, just cut off
and paint what you need for the short term.
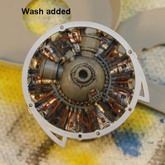
I
painted the cylinders in silver enamel and added a wash (more on washes later).
I should explain that in the picture where it says “With wash”, that I have
not removed the excess wash yet.
See
photos 12, 13 and 14
After
painting the engine parts I glue it all together using Tamiya Extra Thin, stuck
the works in a clamp and left it until the next day - and that brings me to
another point; I’ve learnt that the ability to put something down for a day is
one of the key requirements for success in this hobby. You should resist the
temptation to keep building something especially when it’s going well. Letting
a piece cure overnight will sometimes save you a lot of grief in the end. Just
walk away from it. I often walk into the hobby room spend 2 minutes gluing one
item on, and then leave the whole kit till the next day.
See
photos 15, 16 and 17
I
clipped the wires to size, inserted them into the holes and painted them (with a
brush). Later I added the ring-thingy (another modeling term, I suggest
you use it sparingly), and painted the bolts brass (because I like the way it
looks, not because it’s right), then brushed on a coat of Future (it’s a
clear acrylic coat). I can tell you the wires are not factually correct in their
placement or colour but once again, I like the look.
Added
the little manufacturer logo and then applied a wash to the engine. Remember to
add decals before you add a wash. I used a wash made from scraping dark grey
pastel chalk with my art knife, into a small container then adding a drop of
dish detergent (the green stuff) and water. Mix it up and brush it on. After it
has dried, I take a Q-Tip and start removing the excess. I find with this type
of wash that just breathing on the Q-Tip is enough moisture to remove the
excess.
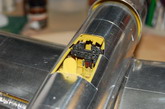
Now
the engine cowl.
See
photos 18, 19 and 20
I
separated the pieces and cleaned them up a little then applied Chromate yellow
with the airbrush.
After
painting, I used ground-up black pastel chalk to dirty-up the intake area. This
is brushed on dry. You can see the ejector pin marks on some of the parts. Some
builders would fill these before they paint however, these will never be seen
so… why bother?
Test
fit everything. You can never test fit enough; it will save you time and cut
down on the amount of 4-letter words you use during the build process. The two
vanes in the intake area are examples of how test fitting will save you some
grief. The instructions tell you to glue them together in place. The problem is
you really don’t know what position these parts end up in until you put the
cowl on. You need to glue them with Tamiya Thin (because it doesn’t set up
right away), and then assembly the bottom part of the cowl to it. This way the
vanes are pushed into the right place. This saves you the grief of adjusting
everything because the vanes dried in the wrong position.
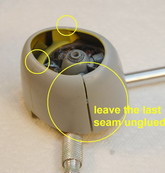
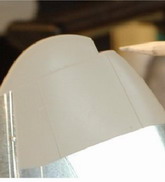
Next,
I put the cowl together. This is where we get back to the “having patience”
thing. First, I assembled and glued three pieces of the cowl, this let me line
up all the seams quite neatly and easily. Then added the last part of the cowl
but only glued ONE side of it to the previously glued parts, then left it
overnight to dry.
See
photo 21
The
advantage of this is that I now have three perfectly lined up seems requiring
little if no corrective work. After the part has dried overnight I can work it,
bend it and force it as much as I want to make the last seam fit properly,
without affecting the other seams alignment. In the end the only seam requiring
clean up was the last one, and that was minimal. Next, the wings!
See
photos 22, 23, 24 and 25
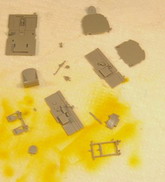
I
separated the pieces; test fit everything, sprayed yellow and added a little
dirt wash. In pictures 26 & 27 is something you’ll come across once in a
while, stuff on or in the kit, not in the instructions. I couldn’t find this
tab in any of the reference pictures I had on hand so I cut it off.
See
photos 26 and 27
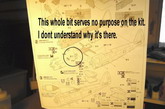
Additionally,
there are sometimes steps I don’t understand at all. I didn’t include in
this build… sure hope I don’t need it in the end.
See
photo28
I
use Tamiya Extra Thin for gluing the wings; the wicking action tracks the glue
down the edge of them. Use some clamps to hold the edges together. You don’t
want clamps that are too tight here, just enough pressure to hold the edges
together. Make sure you get the whole wing glued. It’s easy to miss areas
along the edge. After letting that dry overnight I pulled out the sanding
sticks and cleaned up the edges of the wings moving from course to very fine,
then finally just a buffing stick. Sorry, forgot to take pictures of that
process but it is standard. The purpose is to clean the trailing edges and hide
the leading edge seam. After that, I started adding the foil to the wing and
cleaned up some of the overspray that got on the foil.
See
photos 29 and 30
I
decided to replace the outer marker lights on the wings. The kit provided two
ways to complete these. Our first option is to paint where the lenses are using
some clear red on the left, clear green or blue on the right. Secondly, you can
cut out the piece as I’ve shown in the picture here, and replace with the
glass lens provided in the kit.
For
this kit, I’ve decide to use a half inch piece of clear acrylic rod. The rod
is cylindrical so I filed one side to give it a flat edge. The piece is then CA
glued into place.
See
photos 31, 32 and 33
Using
my Dremel, I grind down the excess material until the rod is about a sixteenth
of an inch larger than the space it’s filling. Then using the sanding sticks
work the rod down to its finished size, finishing off with a buffing stick.
We’ll paint the lens later with some clear green or red. This sanding and
buffing method is the same process you can use to clean up or fix canopy glass.
When I started out if I spilled glue on or scratched the canopy… then it was
toast, nothing I could do about it; I once bough a kit twice just to get new
glass. After reading an article in Tool & Tips, I realized you could fix any
damage (other than breakage), with sanding sticks and Future and it’s really
easy to do.
See
photos 34, 358 and 36
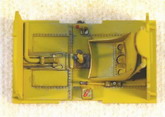
Let's
Jump over to the cockpit, starting with the flight panel. You can do up the
gauges and panel several ways including using the decals that come with the kit.
For the purpose of this article I’m going to pick the one I think will give
you more satisfaction than the decal sheet, yet is still easy to do. The process
I’m using is generally the easy way to get a somewhat detailed look, quickly.
The first thing is a coat of white acrylic paint. I can paint over top of
acrylic with enamel and it will not stick to the acrylic very well. This comes
in handy, as you will see!
See
photos 37, 38 and 39
Using
a toothpick, I lightly rub the face of the knobs and gauges until the black
paint comes off. This happens quite easily. I dry brushed the panel with some
dark grey and silver paint then paint some of the knobs red and yellow. I’ll
go over my dry brushing technique a little later on.
See
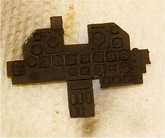
photos 40, 41 and 42
The
final step and what you see in picture 41, is the application of Future on the
dial faces to give the appearance of glass covering them. I used a round
toothpick dipped in Future to fill the space. Where you see the cloudy look is
where the Future hasn’t dried yet. Now for the rest of the cockpit, in the
first picture you’re seeing the interior parts cut from the sprues. There is
still about a half hours work to do cleaning up the pieces before you start
gluing them.
See
photos 43, 44 and 45
One
of the things you can fix easily on most kits - the thickness of the seat. I
used sanding sticks to thin out the sides, back, and front of the seat. It is a
minor thing but it makes a big difference. You can and probably should thin air
duct walls, wing, rudder, vent walls, engine panel covers. When you’re
comfortable sanding the “Glass” from a kit, you’ll also want to thin the
gun sight reflectors down to at least half their thickness (later, you’ll
start using things like a piece of discarded packaging plastic or glue, yes glue
to make the gun sight glass). I only thinned out the seat on this build.
See
photos 46, 47 and 48
Ok,
ok… I skipped a few steps here. I think I somehow deleted the photos for this
part by mistake or just can’t find them on my PC. Really though it’s just
gluing little pieces together, spraying Chromate Yellow and add some red and
black here and there, dry brushed some silver and added a wash you can buy right
off the shelf. This wash is great for one reason in particular; it wipes off
with no after affect. You can thin it with water and just dab it on and it come
in several colours! There’s no rhyme or reason to the colours applied to the
cockpit dials and knobs. As I said, this is a no pressure build done for fun,
just did what looked good to me. Also to back track a little on the silver dry
brushing, normally this isn’t what I would do in this cockpit. As a rule, I
would dry brush this with a primer colour to indicate wear, and a lighter
version of the Chromate for highlighting, and a darker version for dirtying up
the interior. Silver is a quick “highlighter and wear” indicator, just not
necessarily correct.
See
photos 49, 50, 51, 52 and 53
Larry Shred
Click on
images below to see larger images
|

|
|
|
|

|
|

|
|
Photo 7 |
|
Photo 8
|
|
Photo 9 |
|
Photo 10 |
|
. |
|
|
|
|
|
|
|

|
|
|
|
|
|

|
|
Photo 11 |
|
Photo 12
|
|
Photo 13 |
|
Photo 14 |
|
. |
|
|
|
|
|
|
|

|
|

|
|
|
|

|
|
Photo 15 |
|
Photo 16
|
|
Photo 17 |
|
Photo 18 |
|
. |
|
|
|
|
|
|
|

|
|
|
|

|
|

|
|
Photo 19 |
|
Photo 20
|
|
Photo 21 |
|
Photo 22 |
|
. |
|
|
|
|
|
|
|

|
|

|
|
|
|

|
|
Photo 23 |
|
Photo 24
|
|
Photo 25 |
|
Photo 26 |
|
. |
|
|
|
|
|
|
|

|
|
|
|

|
|

|
|
Photo 27 |
|
Photo 28
|
|
Photo 29 |
|
Photo 30 |
|
. |
|
|
|
|
|
|
|

|
|
|
|

|
|

|
|
Photo 31 |
|
Photo 32
|
|
Photo 33 |
|
Photo 34 |
|
. |
|
|
|
|
|
|
|

|
|

|
|

|
|
|
|
Photo 35 |
|
Photo 36
|
|
Photo 37 |
|
Photo 37 |
|
. |
|
|
|
|
|
|
|

|
|

|
|

|
|
|
|
Photo 39 |
|
Photo 40
|
|
Photo 41 |
|
Photo 42 |
|
. |
|
|
|
|
|
|
|
|
|

|
|
|
|
|
|
Photo 43 |
|
Photo 44
|
|
Photo 45 |
|
Photo 46 |
|
. |
|
|
|
|
|
|
|
|
|

|
|

|
|

|
|
Photo 47 |
|
Photo 48
|
|
Photo 49 |
|
Photo 50 |
|
. |
|
|
|
|
|
|
|

|
|

|
|

|
|
Photo 51 |
|
Photo 52 |
|
Photo 53 |
|

