|
Ivory Coast
acquired a small squadron of 6 AlphaJets. When they were operational in 1980,
the Force
Aérienne de la Cote d’Ivoire
became, for some time, the most powerful of the area, before being
ravaged by political unrest and a bloody civil war.
THE
KIT
This
is a classical Heller kit of raised panel lines and no interior detail. It had
the necessary pieces to build both versions: E for training and A for attack. No
armament is included but only an
Aden
cannon.
CONSTRUCTION
Cockpit
tube and seats were scratchbuilt almost completely. Seats were very basic but I
had no intention to spend resins on this kit, so I decided to make them myself
using some reference pictures of the Martin Baker 4. Floor and control panels
were made of plasticard.
The
assembly of the fuselage was difficult. It was divided in three pieces: both
fuselage sides and the belly. All had a very bad joint and I needed a lot of
glue, putty and sanding to make it right. Canopy was also a problem because its
shape was oversized. I added as much weight as the nose space allowed because it
was going to be a tail sitter. Wings and stabilizers also supposed a challenge,
they were very difficult to align correctly and joints had gaps, which were
filled with a lot of putty. I replaced the small antenna located just behind the
cockpit. At the end, I added a small strip of plasticard as the dorsal avionics
bay.
Landing
gear, doors and weapons were left for the final stage, painting them apart.
Click on
images below to see larger images
PAINTING
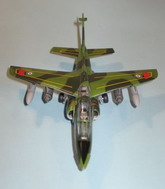
Following
several color plates, pictures and references, I started painting the whole
lower section in Light Ghost Gray, masking only the two tiny jet exhausts with
Tamiya Tape. As I applied a pre-shading, my lack of experience made me to cover
the effect with the second hand of Gray. I decided to continue painting the
model and then to see how to work the light-shade effect. Masking the already
painted areas with more tape, I sprayed a first coat of MM Medium Green. Then I
made the camouflage pattern with the "Blue-Tac like" gum, and
airbrushed Tamiya Nato Green, which matched better the color seen in pictures.
Jet Exhausts were painted in that same metalizer color.
DECALS
As
this kit was a bagged one without decals, I used all the stencils from a Fujimi
kit. After many posts and requests to different distributors, I found that Zotz
Roundels of the World I and II were practically impossible to obtain. In order
to finish this project this year, I went for the option of printing them myself.
I made many fitting trials and when I thought they were OK, I print them over
white decal paper. Then I cut the roundels with care using a very sharp Xacto
blade. After the first coat of Future, they were placed without problems and for
me they look very well. All ID numbers and letters were printed in clear decal
paper for laser printers, and the same procedure was followed. Finally all
decals were sealed with another coat of Future, using a wide paintbrush.
WEATHERING
As
my pre-shading was a fiasco, I tried to darken all panel lines with pastels, but
for me it didn't look convincing. So I tried with a thin coat of highly diluted
Black, and it worked much better. Now I'm using that technique more frequently.
No other weathering was applied.
CONCLUSION
This
is an old kit that demands a lot of work from the modeler. It is not worth for
any kind of aftermarket item. I really suggest the Fujimi kit which has finely
engraved panel lines and much better detail overall.
I
really hope you like this exotic version of the successful AlphaJet.
Thank
you. Saludos desde Monterrey, Nuevo Léon, México…
Fernando
Click on
images below to see larger images
|