|
BACKGROUND
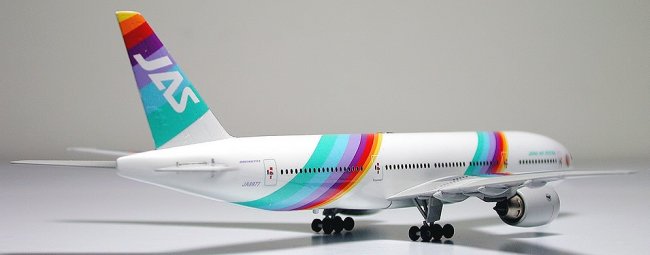
The Japan Air System (JAS) Rainbow 777 is a fleet of Boeing 777-200s flying
Japan's domestic route. JAS was popular for its beautiful
aircraft liveries, and the Rainbow 777 livery is a testament to this. The
rainbow stripe markings on this aircraft was created by a junior high school
student Masatomo Watanabe, who won JAS's design contest for this fleet
of Boeing 777s. From 2001, Japan Airlines (JAL) and Japan Air System (JAS)
began the process of integration, and will largely be operated under
the JAL brand name. In 2004, all JAS flight codes, planes etc. were renamed
to streamline itself to the JAL brand, thereby, the JAS brand officially ended
its existence.
ABOUT
THE KIT
At 1/400 scale, the model measures about 16cm (6.2") long by
15.5cm (6") wingspan wide. The kit is part of Hasegawa's
"Mini Liner Series" of airliner kits in 1/400 scale. The box top shows
an attractive photo of the JAS Rainbow 777 designated JA8977, and other parts of
the box art and fonts were beautifully designed. I took up this project because
supplied inside the box was a very detailed and beautiful decal sheet, and with
only 40+ few parts I would have thought it should be quite easy. Side of the box
says something like, "simple assembly ... just 15 minutes!!" in
Japanese. This is only true if you were to cut out all the parts and glue them
hastily, without painting and applying the decals that is. And it would not
resemble anything close to the Rainbow 777. In reality, to do a proper job on
this kit would probably take at least 5 man days, not 15 minutes.
Interestingly, you would see the Hasegawa logo on the plastic sprues, instead it
is the Dragon brand. Therefore, this could actually be a Dragon designed plastic
kit reboxed by Hasegawa but using Hasegawa decals. Generally, the kit is reasonably
detailed but not excellent. Most of the detailing were done with decals.
|
Click on
images below to see larger images
|
|

|
 |

|
RAINBOW
STRIPE DECAL MARKINGS
The rainbow stripe markings of the Rainbow 777 were beautifully
printed on the decal sheet. On the sheet it is separated into 5 pieces. But
applying the stripes on the kit was nothing short of testing the limits of
my patience. This is especially true at the front and tapering tail end of the
aircraft fuselage. Despite Hasegawa's best efforts (I assume) to render the rainbow
stripes as accurately as possible on a 2-dimensional piece of decal sheet,
transferring them onto a 3-dimensional aircraft model was another story. It
was a very difficult task. I had absolutely no choice but to further dissect the
rainbow markings into smaller pieces in order to get them to fit propely on the
aircraft fuselage's tapering contours. And despite my best efforts, and many
hours invested, I still tore the rainbow stripes at some sections and had
to "borrow" from the bottom marking to "patch" onto the top
areas. This is why if you look at the last photo showing the bottom of the
aircraft there is a missing section of rainbow stripes which should have covered
the bottom of the fuselage, instead the stripes ended abruptly. This is the
single and most difficult part of the project. If you compare the
positioning of the rainbow stripes on this model with real photos of the
aircraft, you would realise that it is not correctly positioned. Oh well, this
is the best I could do. For applying the decal markings, I used plenty of Mr.Hobby
Mark Setter (decal setter/weak glue) and Mr.Hobby Mark Softer (decal softener)
solutions to help me with.
ASSEMBLY
& PAINTING
When assembling the fuselage, it is very important to add some ballast or weight
inside the front fuselage of the model. This is indicated in the assembly sheet,
or else the completed model will be rear heavy and tip backwards. The fuselage
consist of a top and bottom part, that's all. After adding some weight in front
of the fuselage, seal the top and bottom parts using a thin plastic cement. For
this I used Tamiya Extra Thin Cement. The plastic quality of this kit is not as
good as a typical Hasegawa kit, therefore, do not apply too much cement as the
plastic melts easily. The fitting is not very good too, so I had to seal the
gaps with putty and wet sand the seams down to smooth. The
aircraft fuselage was airbrushed with Mr.Color Surfacer 2000, which is a kind of
fine-grit primer, and then followed by Mr.Color Super White IV (colour code
no.156). After that it was polished to a shine using Tamiya sanding sheet (grit
2000) and Tamiya Rubbing Compound. When I'm done with the polishing, the
fuselage was washed clean and left to dry. Then I began to apply the decals.
When completed, the fuselage was washed clean to remove any excess traces of
decal marking solutions. Then I used Mr.Hobby Super Clear spray can to coat the
fuselage with a few thin misty coats to seal the decals, then a thick glossy
clear coat minutes later, all under a hot afternoon's sun. Finally, it was
polished with Tamiya sandpaper, nail buffering stick and polishing compound. The
only more challenging part of painting this kit is probably the underside of the
main wings. The boat-like objects hanging under the wings, called
canoe farings, are actually enclosures for the mechanisms that extend and
retract the wing flaps and slats during flight. They are of the same light gray
colour as the outer edges of the wings, and these parts extend into the inner
darker gray parts of the wing (see last photo). Careful masking is inevitable.
The same goes for the two engines, each of which is only consisting of 3 parts
but involve quite a bit of different colours with small surface areas to work
on. To summarise, many of the parts are really small, and a decent pair of
pincers is absolutely needed. Not forgetting that organising the parts in small
zip lock bags is strongly recommended, as they can be easily misplaced.
|
Click on
images below to see larger images
|
|

|
 |

|
CONCLUSION
When I finally completed this project, and began to
visually enjoy the fruits of my labour, I realised something. It
dawned upon me that I had invested much more effort than I had expected on
this kit, certainly not "15 minutes" as described on the box, and so
much of the details are barely visible (especially the engines and underwing
details) due to the small scale of the model. Nevertheless, this is my
tribute to the JAS enterprise and its creative livery of the Rainbow 777. I
hope you have enjoyed this article and the photos.
|
Click on
images below to see larger images
|
|

|

|
 |
 |
REFERENCES
Randy
|
|