|
I've always been
interested in the SBC-4, ever since I saw that Heller made a kit of it. Now I
recognize the fact that not all Heller kits are great, including their older
stock, but it seemed that they had the corner on the market.... until, that is,
I saw an ancient Matchbox kit on e-bay. Some people may collect models... Not
me. I build 'em! I knew it was "vintage" but it couldn't be any worse
than Heller, right? Right.
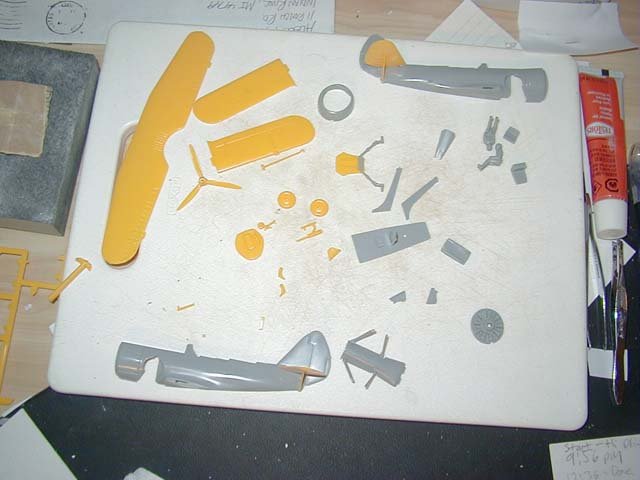
In fact it was rather interesting. It's part of the Matchbox "2 Color"
series, where 1 sprue is molded in grey and 1 sprue in yellow. Thus if a novice
young child were assembling it, the pieces are staggered so that the colors
resemble the finished product's paints (well, sort of) without being painted!
Rather interesting idea there. Also has a color diagram on the side of the box
showing what the finished unpainted model would look like. Note: I have a
Gladiator from the same series but in different colors (silver and dark
grey).
| Assembly
was ... Okay. Not great. Not horrible. The fit on the ventral fuselage was
poor, as was the lower wing joins. The rest, however, was good enough to
work with. I was rather pleased to note that the date on the inside of the
fuselage -- the mold date -- was the year I was born.
I had high hopes before I
got this, and now I was reassured that this was going to be a great
model. I put off painting right away, so I started working on cleaning up
the pieces and I glued the tail fins on (and their braces). I had to check
my references for the proper placement of the struts. They have a
peg-&-hole system on the wings, but not for the fuselage join. There
is a hole you have to carve out of both sides of the fuselage, and then
when you assemble the fuselage you trap the arrestor hook in between. I
don't know if it was intended to be movable or not, but if care is taken
you can assemble it that way. I wanted to assemble it in the deployed
position, to show off the fact that, yes, there is a landing hook!
Speaking of the two fuselage halves being put together, there is a slot
you can cut out from each side to allow a stand to be used (for gear up
display or just for fun). However, no stand is included! Pity. I'd have
liked one.
|
|
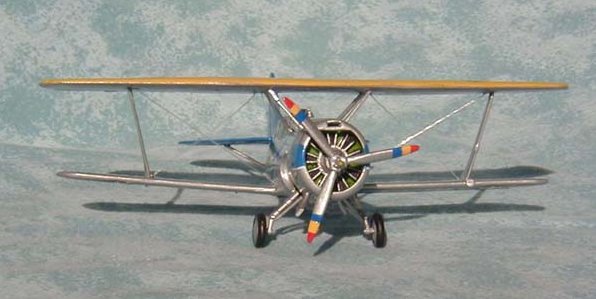
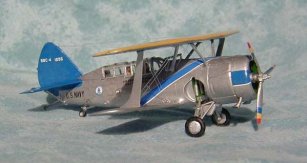
I chose to do the gear down
because it didn't look like the gear doors would "close"
properly, and because I like to display my models on shelves and flat
surfaces -- having landing gear helps this along. Once I started painting
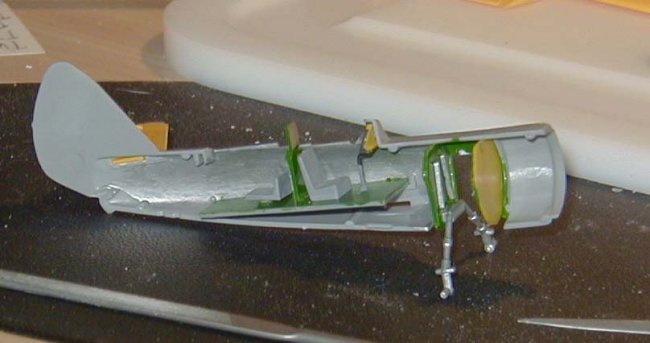
I got some things assembled. Supposedly I am to use interior green. This
is not uncommon, but the early aircraft like this
also had other colors on the inside. I decided to paint the deck, the
divider between front and back, the gear bay, and the cowling all
interior green, but I did the fuselage walls in aluminum, as well as the
gear doors. I had planned early on to close the canopy. I knew I'd not see
too much. However, the contrast between green and aluminum should be
visible, adding a hint of eye candy even through a small greenhouse
canopy. In truth, one can barely see past the pilot figures. Pilots!
Yes! It comes with pilots! I decided to include them because there is
little cockpit detail. I added a stick from my spares (none included) but
you can't even see it. I stowed the gun in the proper position, put the
pilots in, placed the turtle deck "up" and by the time I got the
canopy on the only thing visible was the pilots' faces. Oh well, at least
I took the time to paint them nicely.
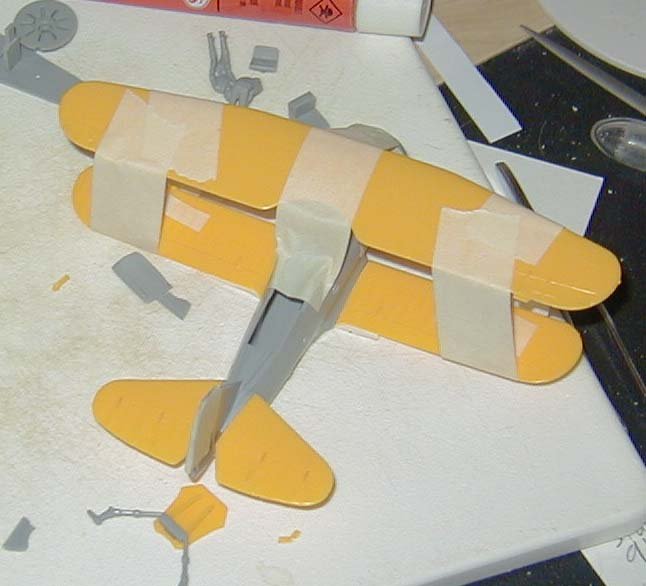
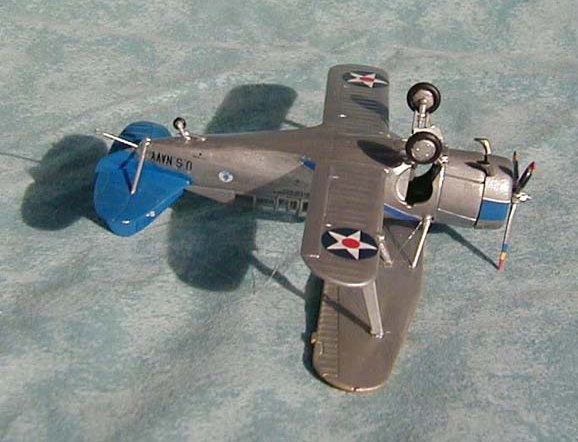
One thing I should note:
This is my first biplane. The lower wings attach to the fuselage. The
fuselage has a set of braces, and the outer wings have a set. Now, the top
wing is solid. It has to attach to the fuselage braces. Sooo..... What
angle do I attach the lower wings at so that I ensure all braces make
contact with the inflexible upper wing?
You see, if I angle them too steeply, the fuselage braces won't even
contact the top wing. If I do them too flat, the outer wing braces won't
contact the top wing. Ugh.. So I taped the whole thing together. I taped
the outer struts in place, I taped the top wing to the fuselage struts,
which were in turn taped to the fuselage which was in turn taped
together. I then had to glue the lower wings on while matching all the
struts to where they had to go. Not an easy task on this model. The task
proved much easier on my Gladiator, just because of the way it's set up, I
suppose. I also got the proper angle on the outer struts this way. On the
SBC they angle outwards steeply.
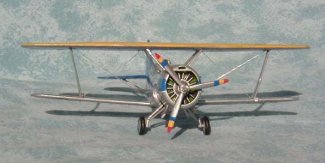
This was my first biplane
and my first attempt at rigging. I had tried to rig WW2 fighters before (a
simple piece of thread between the tail and the mast) and that didn't work
to well, so I was intimidated with this project. I had no drill, but I
took a needle and heated it over a flame, then poked holes
in the plastic. Some holes were too large, some
just right. I used CA glue to anchor one end of the thread and tried
to cut it to length then hold in place with tweezers |
|
| while
the glue dried.
This didn't work. It was
all too slack. I didn't like the result. I was about to chalk it up
to being my first time, but then had a breakthrough. |
|
Click on
images below to see larger images
|
 |
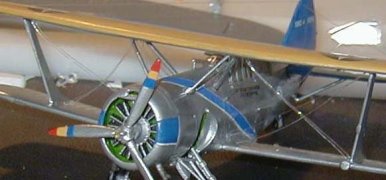 |
Micro-drill!! I got a micro drill
when I went to go get some French Blue for the tail and cowling (the diagonal
stripe is a decal -- even with this age it still matches the paint color
nicely). I did the radio aerials with the traditional method (drill a hole
through, pull taught,
trim excess) and loved it. However I was unhappy with the rest of the rigging.
It looked crappy to me :( Hey, I told myself, I'm the only one that counts here.
I build for me! I didn't like it! So I yanked them out with some good pliars and
re-drilled and re-rigged the wing brace wires. Now we're cooking! Now I'm
a REALLY happy camper. I have a new bragging showcase!
|
Click on
images below to see larger images
|
 |
 |
Disappointing areas:
No bomb. No drop tank. No under-wing bomb racks (and yet oddly they are present
in the painting instructions). No stand (not that big a loss). Worst of all the
prop doesn't spin well. No blowing on it. That's half the fun! It wobbles. If
you know about it you can work on it and get it to stay nice and steady, but I
did not know.
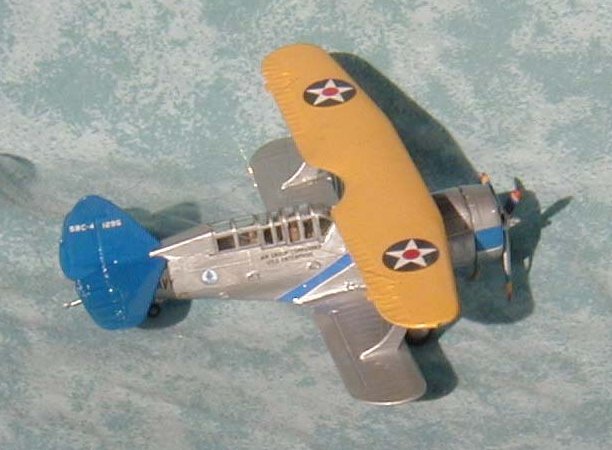
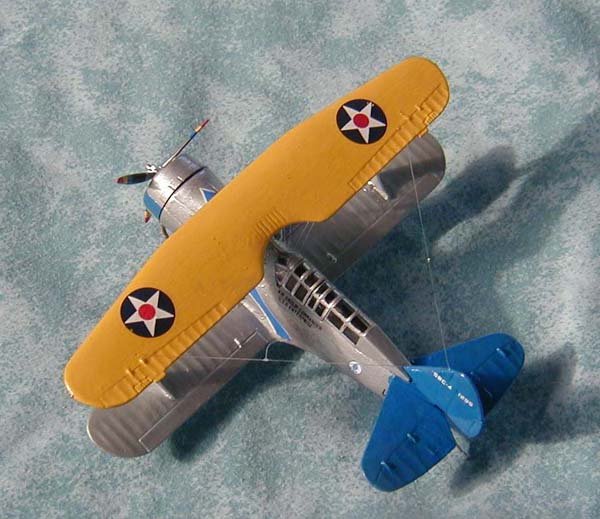
This plane looks
great. It truly is an icon of the Golden Age of Aviation. There are a couple of
these in the ARC gallery right now, both showing Marine craft. I say this
wonderful yellow wing version has caught my fancy more than Marine greys ever
will (no matter how
respectable the Marine craft in question). I did this for the Biplane Group
Build (still ongoing! *advertisement*). I'm still slightly giddy from getting it
done and having it look (to me) so beautiful. An ungainly bird. An obsolete
bird. But a classic bird nonetheless! Some
day I intend to get the Heller version and compare.
Mark
|
|