|
This
mythological heroe has been reasonably well supported in 1/72 scale but the
Vulcan remains unkitted in quarter scale injected plastic.
Aeroclub Models of Nottingham, UK, did produce a vac-form in 1/48 scale a few
years ago but this is now out of production - I obtained mine direct from Aeroclub at
the time.
This
is the largest kit that I have attempted to date but was relatively easy to
construct. Aeroclub provides vac-formed fuselage and wings with the
intakes and exhausts as large resin castings. Detailed parts for the
undercarriage, engine compressor, cockpit and various antennae are provided in a
large bag of white metal components. A large decal sheet is supplied with
markings and stencils for early and late camouflaged Vulcan B2s. If you
want to model an "anti-flash" B2 then you will need to find large low
vis RAF roundels. If you want to model a B1 then you will need a
large
knife and possibly therapy!
|
Click on images below to
see larger images |
 |
 |
The
vac formed components comprise upper and lower fuselage halves from nose
to tail including the wing portion up to the edges of the intakes.
To this are attached upper and lower wing halves. The wheel well walls and
bases are separately vac-formed and I added extra detail using the cut-away
drawings in "The Vulcan Story" book by Tim Laming as a reference.
I also added some interior detail around the crew entry steps although this is
now impossible to see (at least I know it's there!). The tail is vac-formed
in two halves and fits snugly onto a moulded lug on top of the fuselage.
All of the vac-formed components went together well but filler was needed along
all the joints to produce a smooth finish (2 tubes of filler in total).
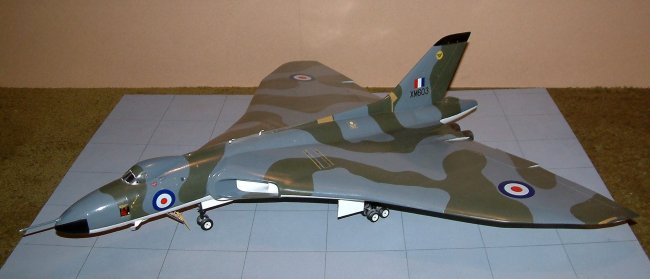
The
model represents a Vulcan B2 of No.9 Squadron at RAF Cottesmore in 1964.
These were finished in dark sea grey/dark green upper camouflage with
white undersides and did not have the large RWR fairing on top of the tail. This
was removed and the tail tip faired in using more filler.
Once
filled and sanded I primed the fuselage with grey auto primer (spray can) and
sprayed the underside gloss white (again using auto paint). I brush
painted the camouflage (!!!) using Humbrol enamel paints. The decals came
from the Aeroclub sheet with some swapping around of the A/C numbers to produce
XM603. I applied roundels to both wing upper surfaces although I suspect
that the actual aircaft had wing roundels only above the port wing.
The white metal undercarriage was detailed with brake lines again using
the Tim Laming book as a reference and was fitted in stages to ensure that all
of the wheels touched ground. The canopy is supplied as vac formed clear and was
masked and sprayed black before the camouflage was added. I attached
styrene "clips" to the inside edge of the canopy so that is fits
snugly to the fuselage but is easily removable to show the completed cockpit.
The frames were painted with a bronze/gold edge with white decal seals.
The wipers are white metal as provided by Aeroclub.
|
Click on images below to
see larger images |
 |
 |
Once completed the size of the model is impressive
but will not fit on any normal shelving. Mine gathers dust above a stereo
system.
A great model from Aeroclub - how about a Valliant and a Victor for
company?
On second thoughts perhaps not as I will need a larger house!
Darius
|