The Kit
I believe
this is MRC’s first in a series of 1/35 scale “Choppers” designed to
compliment the 1/35 scale figure modelers.
The kit is nicely done in both raised and recessed panel detail. The cockpit is well represented with raised detail.
However, a good after market resin company
(Hint, Hint…Chris Miller) could do this kit justice.
Construction
I
built this kit several years ago when it was first released. For the most part,
it is mainly out of the box. At the
time, I had just begun modeling seriously and was still experimenting with
techniques. Since no after market
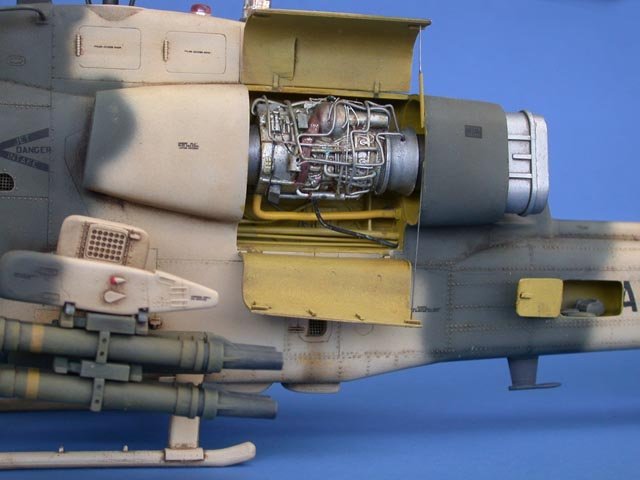
kit was available at the time, I decided to spruce up the kit with various odds
and ends. I just added wires and
stretched sprue throughout the kit. The
idea was to make the kit look somewhat busy and believable.
The kit
itself went together quite well. My
only complaint would be the cockpit canopy was a little undersized.
I replaced the molded in grill with photoetch screen.
I opened up the access bay in the tail boom, boxed it in with sheet
styrene and added a styrene hatch.
Painting
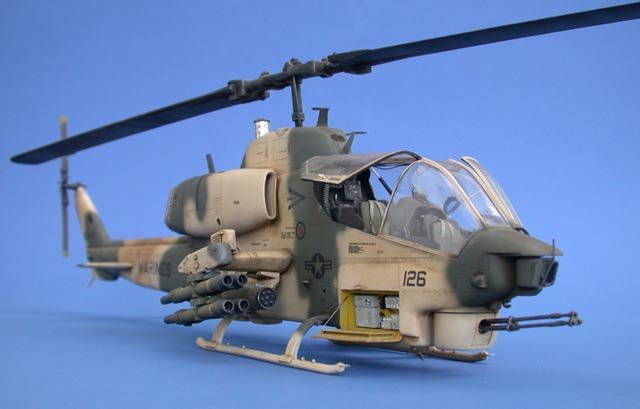
After surfing the web for
“Whiskey Cobras”, I found a picture of one in a two tone sand and green
scheme. I used Testors Sand and
Dark Green for this project. I
first sprayed the kit with the Sand color, right out of the bottle, mixing it in
a 1:1 ratio. This was my base color
and my primer coat. I then
sprayed a panel shading using Testors brown.
Once that was done, I took the base color sand and lightly sprayed the
entire model, until a hint of the panel shading was visible.
Then taking the base mixture, I added about 30% white sprayed the inside
of the panels to highlight them. Once
that was done, I took the same base mixture and thinned it down with about
70% thinner to 30% paint. And sprayed the entire model until I got a good
balance of highlight colors and panel shades.
This process was repeated with the Green color.
Decal
& Weathering
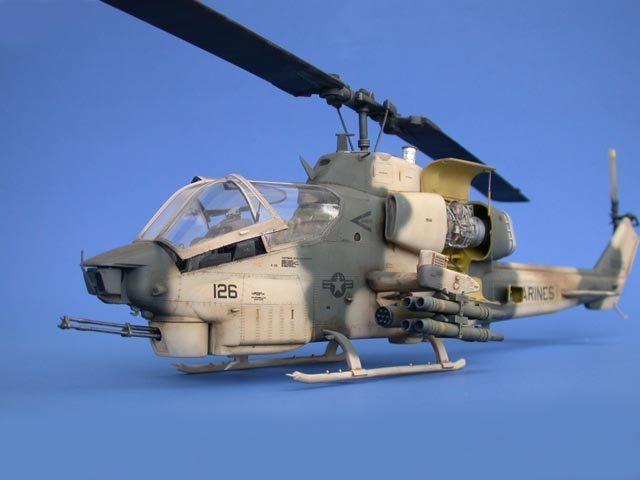
After the model
was painted and allowed to dry for approximately 24 hours, the kit was sprayed
with several light coats of Future acrylic floor shine. This was allowed to dry for about a day.
At this time, a wash of Raw umber oil by Windsor and Newton ( very good
oil paints) and turpenoid was applied to all the recess panel lines.
After allowing this to dry, the kit decals were applied using Solvaset
setting solution. Finally, the
entire kit was dull coated with Testors dull coat.
Conclusion
As I
stated earlier, this was my real first attempt at detailing. The “Experts” might find more than their fair share of
inaccuracies with my kit and that’s OK. What
I hoped to have shown here is that with a little imagination, any kit could be
made to look interesting and fun.
Henry
|