|
I love the
Grumman A-6 Intruder, I also greatly admire the work of Scott Murphy and his
great A-6E's (http://members.tripod.com/scottsmodels).
So much so that I had to go out and get up to four 1/72nd and six 1/48th A-6's
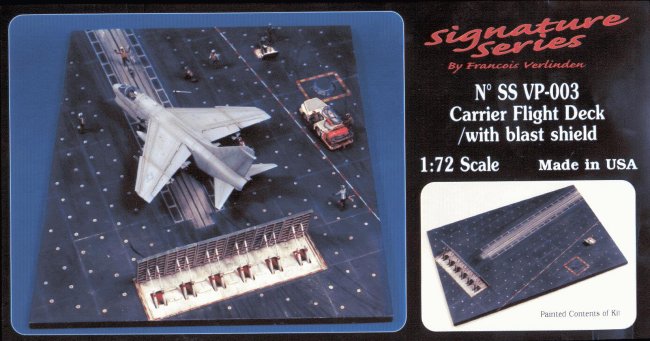
and EA-6B's, and this is one of those many kits, plus a Verlindin Resin Catapult
set. Scott's great A-6E Catapult diorama provided the inspiration for this
project and I hope he won't mind the homage to his work. The project was
made up of three kits, the A-6E, the Verlindin Catapult, and the Fujimi Carrier
Deck Crew, all of which I built up together at the same time.
The whole
project took about two months and was stopped twice, once because of a jammed
airbrush (thank you Testors for replacing it) and second because of the terrible
events of September 11 (I am a TV News Photographer and worked a lot that week).
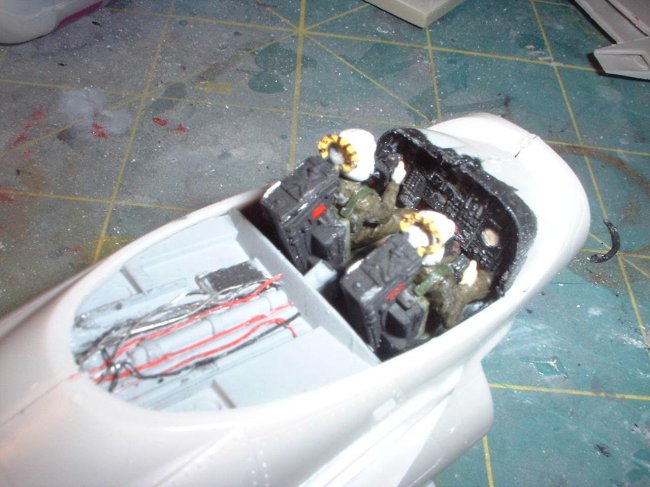
Cockpit
I started as always with the cockpit, which is quiet good and
well detailed for a 1/72nd kit. For some reason (maybe if your lazy)
Fujimi included and wants you to use a decal for the instrument panels even
though they have provided a raised detail panel and counsels, I of course
painted them instead. Although people would only ever see the cockpit
through a closed canopy I still wanted to paint it up right.
| I did notice
a few errors in the placement of things on the instrument panel which I left
alone, but if you want accuracy I suggest getting the Eduard set instead
(designed for Italeri kit, but should work on the Fujimi kit). I also used
the kit ejection seat since it was going to be a closed cockpit (I did not want
to waste my True Details resin ones) and I was pleasantly surprised at how nice
they built up. The only detail I added to the seat was some PE shoulder
straps to the Pilot and BN (leftover from an 1/72nd Eduard set for the
EA-6B). |
|
|
The rear deck behind the seats is OK in detail, but I added some
wires to it for complexity, and after I was done I realized no one would ever
see it because of the closed canopy- Dhooo!
|
|
| I also added wiring, ductwork
and first aid kits to the rear canopy bulkhead, as well as the lighting counsel
in the top of the canopy and the four mirrors around the edges, figuring that
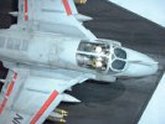
this all would be seen through the canopy. |
|
| As far as the pilot figures I
had to cut down their feet to fit (the front instrument panel is a real tight
fit), applied a wash of black pastels and I turned the head slightly of the BN.
Later I added a piece of clear film for the gun sight (cut from an X-Acto
package) and tinted the two front windows blue with Tamyia Clear Blue. |
|
Intakes and Exhaust
| Before I could join the halves I had to paint the
compressor blades (separate parts thankfully) and the intake trunk, then glue
them in place. I applied masking tape to the
white inside of the intake trunk before I glued the parts together to save me
from doing it later when everything is glued together and it's more
difficult. |
|
| Fujimi even provides the exhaust trunk and the rear of the
engine face, I instead chose to save these parts for my Italeri A-6E kit that
will be super-detailed. On the subject of the exhaust, Fujimi, like
Hasagawa did on the
EA-6B I built here on ARC, chose to mold it as one piece, when it is in fact two
parts. As I did with the EA-6B I cut the fuselage to the correct shape (a
curve to a straight line) and then fit a piece of evergreen tubing into place
for the tail pipe itself, this gives a much more realistic look and is easier to
paint (paint tube before inserting). |
|
|
Although the surface detail of
the kit is very nice, I chose to add to it with my hand drill using a very
small bit (.80). I drilled a lot of holes (I didn't count but at least 40
or so)
along the spine of the aircraft to simulate the rivets that are very
visible in most pictures. Although not all of the holes are even and it
was time consuming, they help add interest to the area that people will
see the most, the upper surface of the plane. |
|
Also painted and glued in place was
the nose wheel well, which I did not detail (it does need it) because no one
will see it. That done, the halves where joined with a good fit and minor
filling needed. Next came the center underside followed by the birdcage
and the tail hook compartment, all with a good fit. Also glued on was the
two fuselage air brake panels, on the E model it is not a functioning air brake
as the wingtip ones replaced it.
Everett
 |
 |
 |
 |
|
1/72nd Fujimi A-6E
With a Verlindin Resin Catapult
set diorama Part 2
|
1/72nd Fujimi A-6E
With a Verlindin Resin Catapult
set diorama Part 3
|
1/72nd Fujimi A-6E
With a Verlindin Resin Catapult
set diorama Part 4
|
1/72nd Fujimi A-6E
With a Verlindin Resin Catapult
set diorama Part 5
|
|
|